|
|

|
AD: ArcaOS 5.1 Russian LIP
Russian ARCAOS exists and it's available since the middle of 2017.
All versions are supported: 5.1, 5.1.1.
eCo Software is able to maintain OS/2 LIP packages for any other language
(German, Dutch, Brazilian Portuguese, Spanish, Sweden, etc)
|
Howto: Install eCS 2 on modern Laptop keeping Preinstalled Windows 7 |
TITLE: Howto: Install eCS 2 on modern Laptop keeping Preinstalled Windows 7
DATE: 2010-08-04 15:15:47
AUTHOR: Sigurd Fastenrath
Please use online translator
go to http://translate.google.com
and request the translation of http://en.ecomstation./showarticle.php?id=214
to your language |
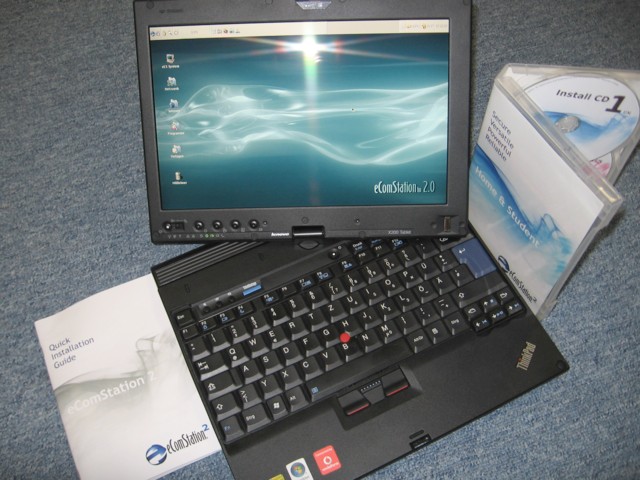
Howto for installing eComStation 2.0 GA next to a Preinstalled Windows 7 (Pro 64-bit) on a modern Laptop (Lenovo X200T).
Download from hobbes.nmsu.edu
Anleitung - Howto
eComStation 2 - Laptop - Windows 7 Preinstall
(Version 1.0 - © Sigurd Fastenrath - 3. August 2010)
Inhalt - Index
| Deutsch: | English: |
- Haftungsausschluss
- Einführung - Ziel
- Voraussetzungen
- Vorbereitung von Windows 7
- Bearbeiten des Festplattenlayout mit DFSEE
- Installation von eComStation 2.0
- Dockingstation
- Weitere Hinweise
- Marken
|
- Disclaimer
- Introduction - Target
- Requirements
- Prepare Windows 7
- Prepare the Disclayout with DFSEE
- Installation of eComStation 2.0
- Dockingstation
- Additional Information
- Acknowledgements
|
Haftungsausschluss - Disclaimer
|
Trotz sorgfältigster Vorbe-reitung und Überprüfung dieser Anleitung
übernehme ich keine Haftung oder irgend eine Art von
Gewährleistung für Schäden an Hard- und Software oder irgend eine Art von Datenverlust, die durch die Benutzung dieser Anleitung entsteht.
Ich weise darauf hin, dass das Vorgehen nach dieser Anleitung ausschließlich auf eigenes Risiko erfolgt.
© Sigurd Fastenrath - 8/2010
|
The content of this Howto has been carefully prepared and reviewed.
Even though I do not take any responsibility nor liability on any kind of damage at hard- or software; dataloss or any other damage probaly caused by following this howto.
I do inform you that the use of this Howto is at your own risk.
|
Einführung/Ziel - Introduction/Target
|
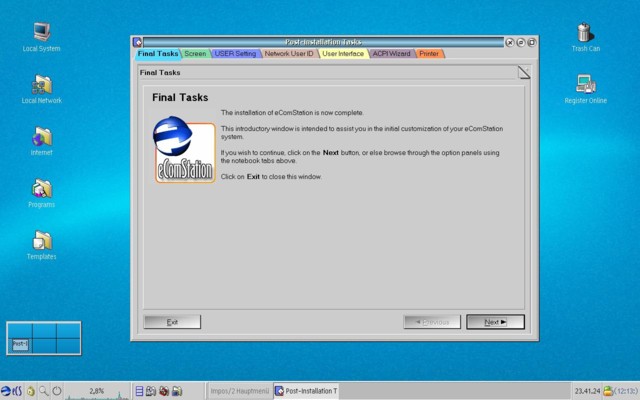
Viele moderne Laptops werden mit vorinstalliertem Windows 7 und ohne Wiederherstellungsdatenträger oder Betriebssystemdatenträger ausgeliefert.
Ziel dieser Anleitung ist die native Installation von eComStation 2.0 auf einem modernen Laptop, wobei das vorinstallierte Windows 7 erhalten bleiben und durch die Verwendung des Bootmanagers ein jedes der Betriebssysteme beim Start ausgewählt werden kann.
Diese Vorgehensweise wurde auf einem Lenovo X200T getestet und sollte auch auf anderen Laptops dieser Hardwaregeneration funktionieren.
|
A lot of modern Laptops are deliverd with a Windows 7 preinstalled but do miss Recovery- or Operatingsystem Media.
This Howto is intended to help you get nativ eComStation 2.0 installed next to Windows 7 on a modern laptop while preserving the preinstalled Windows 7.
It describes the opportunity to choose via Boot Manager the Operating System you want to use at startup time.
This has been tested with the Lenovo X200T Laptop and should work with other Laptops of the same Hardwaregeneration.
|
Voraussetzungen - Requirements
|
Zur Durchführung benötigen Sie folgende Hard- bzw. Software mit den folgenden Eigenschaften:
|
Here is the list of the required Hard- and Software and additional information:
|
- eComStation 2.0 media and Licence
- Laptop with/mit "Compatiblity mode" for/für IDE Harddisk
/Festplatte (Teilweise funktioniert es auch im AHCI modus aber nicht
stabil - Might work in AHCI mode but not stable) *
- DFSEE Boot CD (Kostenlose Probe CD im Internet erhältlich/ Demoversion availiable)
- CD Drive/Laufwerk (Intern or/oder USB)
- Zeit/Time
- Ruhe/Patience :)
* = ( Stand 8/2010 - ein Treiber für AHCI modus ist in der Entwicklung - Driver under construction/in developement)
|
Vorbereitung / Prepare Windows 7
- Mein Lenovo X200T wurde ohne Recoverymedien ausgeliefert, deshalb
als erstes unbedingt die Wiederherstellungsdatenträger mit dem mitgelieferten Programm von der Festplatte erstellen!! Schauen Sie dazu in die mitgelieferte Dokumentation Ihres Laptops!
Sichern Sie zusätzlich all Ihre persönlichen Daten!
- Die Festplatte kommt vom Werk her mit drei Primären Partitionen,
von denen wir zwei löschen müssen - dies sind die Recovery Partitionen
- Eine Wiederherstellung von Festplatte wird nicht mehr möglich sein, wenn eComStation installiert ist, deshalb achten Sie auf eine saubere Erstellung der Wiederherstellungs CDs/DVDs!
|
- My Lenovo X200T has been delivered without Recoverymedia - so FIRST OF ALL: DO CREATE RECOVERY MEDIA!!! Please do refer to the documentation shipped with your laptop. Backup all your personal Data!
- The factory disc Layout came with 3 Primary Partitions where we do have to delete two of, those are the recovery Partitions.
- As a result Recovery from Harddisk will NOT work once you installed eComStation !! It will work with the Recovery Media you created - so please take care to do it carefully!
|
|
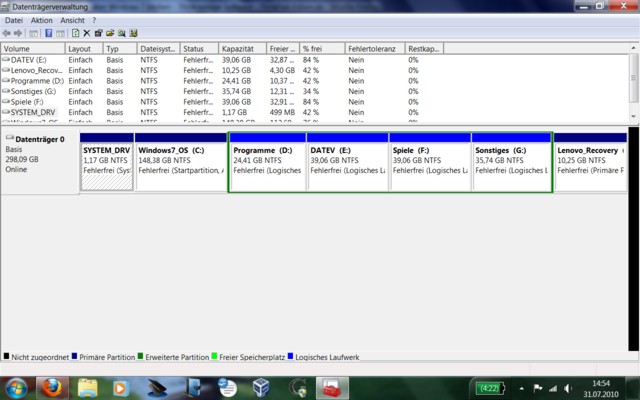
Auf dem Bild erkennt man den Auslieferungszustand der Festplatte mit drei primären Partitionen, dies sind (Windows7 Datenträgerverwaltung):
|
The picture shows the factory disc layout with the three primary Partitions (Windows7 Discmanager):
|
|
SYSTEM_DRV (BootPartition "Aktiv") ; Windows7_OS , Lenovo Recovery
|
|
SYSTEM_DRV und Lenovo Recovery sollen gelöscht werden, SYSTEM_DRV wird die eComStation Boot Partition, aus Lenovo Recovery wird die Datenpartition
(Die logischen Laufwerke D,E,F,G sind ohne Bedeutung)
|
SYSTEM_DRV and Lenovo Recovery will be deleted, where SYSTEM_DRV will become the Boot Partition and Lenovo Recovery will become the Data Partition
(the logical drives D,E,F,G are not relevant)
|
|
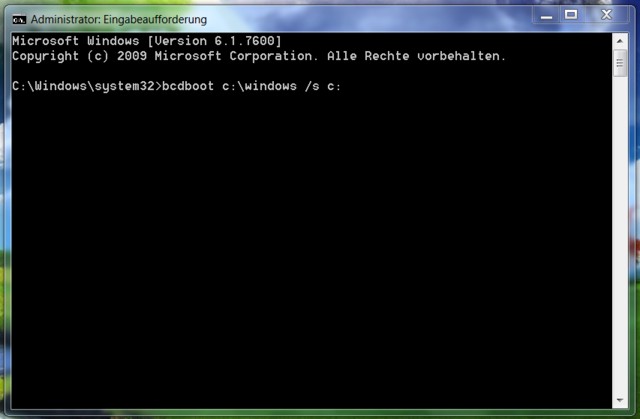
Schritt 1: Windows 7 Bootdateien auf Laufwerk C: erzeugen: Kommandozeile im Administratormodus öffnen und eingeben
bcdboot c:\windows /s c:
ENTER drücken
|
Step 1: Create Windows 7 Bootfiles on drive C: : open a commandprompt as Administrator and type:
bcdboot c:\windows /s c:
Press Enter
|
|
Schritt 2: In der Windows 7 Laufwerksverwaltung Laufwerk C:
Windows7_OS als "Aktive Partition" festlegen; Neustart
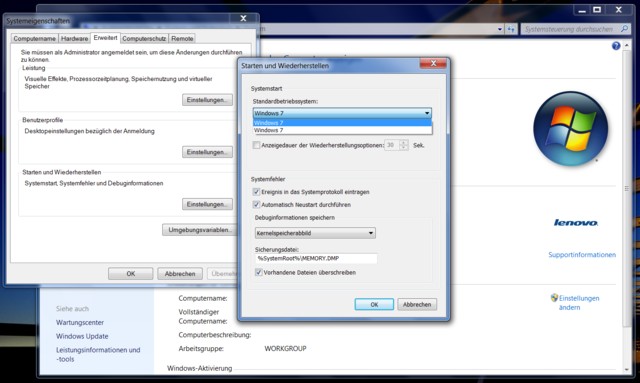
Schritt 3: Nach Neustart im erscheinenden Windows7 Bootmenü
den unteren Eintrag wählen um den Bootvorgang fort zu setzen
(kann später in der Windows Systemsteuerung dauerhaft so
eingestellt werden - siehe Bild)
|
Step 2: Got to the Windows7 Disc Manager and select Drive C: Windows7_OS as "Active Partition", Reboot
Step 3: After Reboot select the bottom "Windows 7" at the "Windows 7 Bootmanager" to continue the boot process (can be fixed later via the Windows 7 System Setup - see picture)
|
|
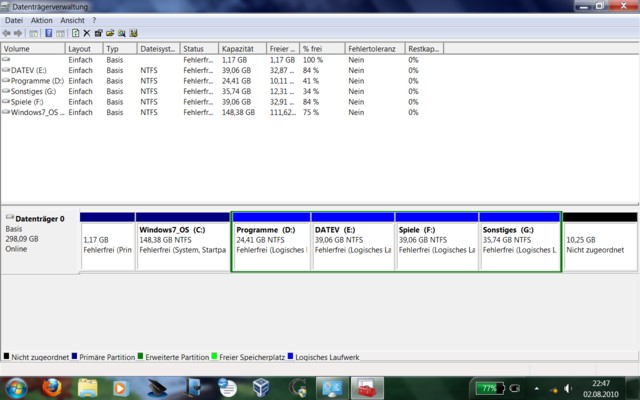
Schritt 4: Windows 7 Datenträgerverwaltung öffnen
und die beiden Laufwerke SYSTEM_DRV und Recovery Lenovo löschen,
danach sieht es so aus:
|
Step 4: Open the Windows7 Disc Manager and delete the Partition SYSTEM_DRV and Recovery Lenovo, then you have:
|
|
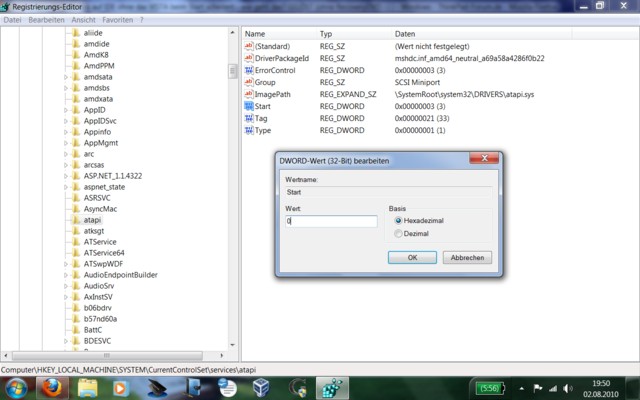
Schritt 5: IDE Unterstützung installieren: Starten Sie das
Programm "regedit" und ändern Sie unter: HKEY_LOCAL_MACHINE\System\CurrentControlSet\Services die Startwerte
für: atapi, Intelide und pciicde von "3" auf "0" (Null),
danach Neustarten
|
Step 5: Install IDE support in Windows 7: Open "regedit"
and change in HKEY_LOCAL_MACHINE\System\CurrentControlSet\Services
for: atapi, Intelide and pciide the start value from "3" to "0" (Zero),
Reboot
|
|
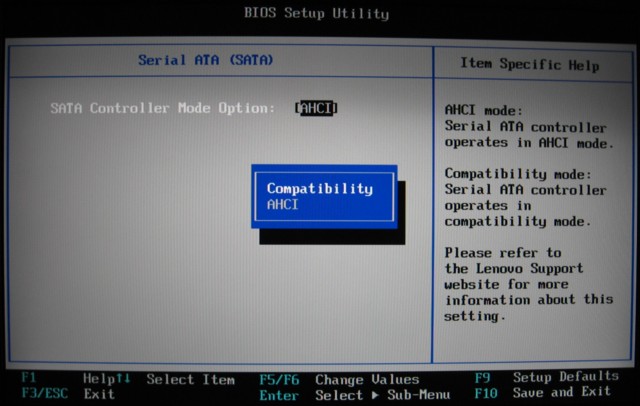
Schritt 6: Nach dem Neustart gehen Sie in das BIOS des Laptop
(Taste F1 bei Lenovo) und ändern den SATA mode von "AHCI" auf "Compatibility"
(=Standard IDE Modus), nach Sichern (F10) und Neustart sollte Windows 7
die IDE Treiber nachinstallieren
|
Step 6: Once the System reboots got to the BIOS of the Laptop
(Press F1 for Lenovo) and change the SATA Mode from "AHCI"
to "Compatibility" (Standard IDE Mode), after save (F10)
and reboot Windows 7 should install the standard IDE Driver.
|
Bearbeiten/Prepare Festplattenlayout mit DFSEE
|
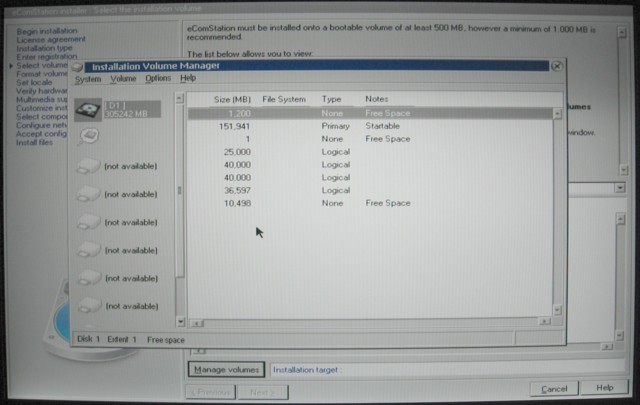
Wenn nun die eComStation 2.0 CD ins interne oder über einen USB Anschluss angeschlossene CD/DVD Laufwerk eingelegt und die Installation gestartet wird, ist es nicht möglich neue Laufwerke anzulegen oder den Bootmanager zu installieren
|
Once you start the eCS 2.0 installation process from either an internal or external USB CD/DVD Drive it is not possible to create partitions or install the bootmanager
|
|
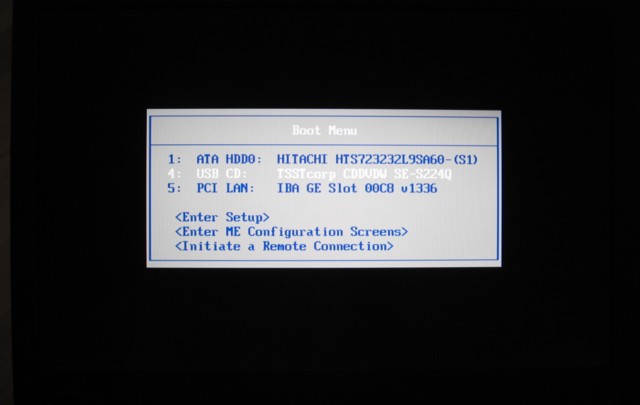
Um dies zu umgehen, kann man die folgenden Schritte ausführen. Diese habe ich sowohl mit der eingebauten 320GB Platte als auch mit einer 500 GB Platte verifiziert. Es wird die Bootbare DFSEE CD eingelegt und von dieser gestartet
|
To overcome this, insert the bootable DFSEE CD and boot it. I verified the following steps with the internal 320 GB HDD and another 500GB HDD.
|
|
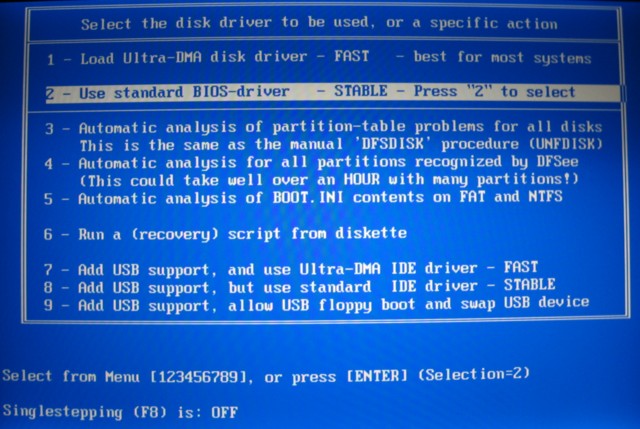
Bestätigen Sie die Auswahlen einfach zwei Mal mit "OK"
|
Just confirm the start menu by pressing "OK" two times
|
|
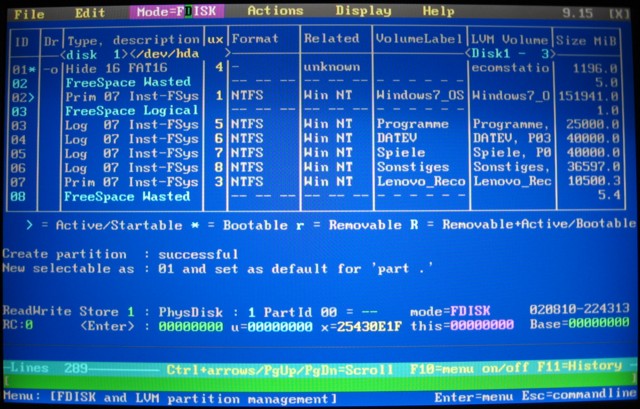
Beim Start und einlesen der Partitionen "beschwert" sich DFSEE über nicht passende Festplattengeometrien. Um dies zu beheben sind zwei Schritte zu tun:
|
DFSEE reports "not matching Partitionsizes", to overcome this follow these two steps:
|
- Mode=FDISK =>Fix CHS value to Geometry=> select HDD/Platte auswählen
- Mode=FDISK=>OS/2 LVM and Bootmanager=>Add default LVM info
|
Installation eComStation 2.0
|
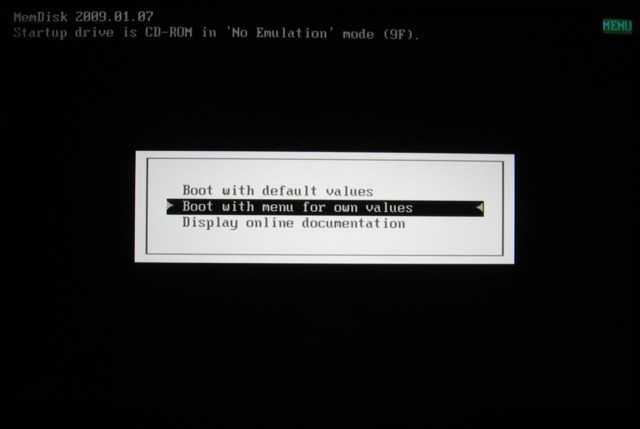
Entnehmen Sie die DFSEE CD, legen Sie die eComStation 2.0 CD ein und starten
Sie neu, wobei Sie von der eComStation 2.0 CD starten, wählen Sie "Starten
von CD" und "Boot mit Menü für eigene Werte"
|
Eject the DFSEE CD, insert the eComStation 2.0 CD and reboot, choose to
"boot from eComStation CD" and "Boot with menu for own values"
|
|
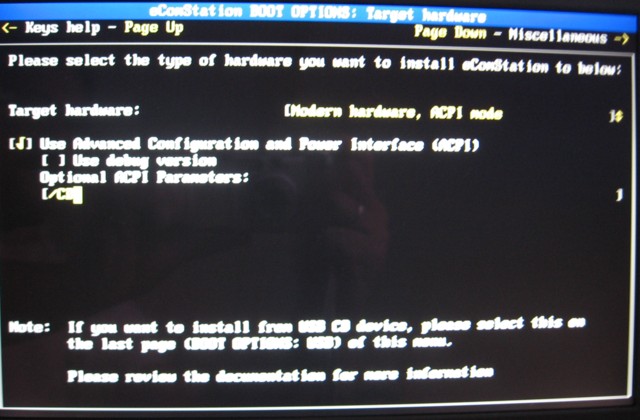
Geben Sie Ihre Werte ein, es empfiehlt sich bei den
"Optional ACPI Parameters" /CD einzugeben, wenn ACPI
ausgewählt wurde (ebenfalls empfohlen)
|
Customize according to your needs, I recommend to add the ACPI parameter
/CD in case you want to install ACPI (recommended as well)
|
|
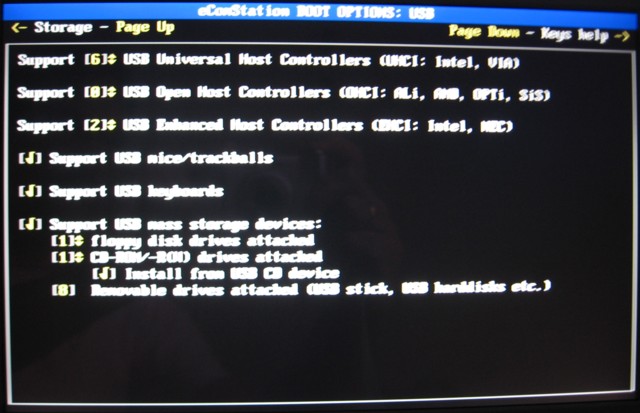
Geben Sie Ihre Werte ein (Land!), vergessen Sie nicht, falls von USB CD/DVD
installiert wird, dieses expizit auszuwählen, auf der Seite BOOT OPTIONS:
USB, unten
|
Customize according to your needs (Country!), do not forget to check the
needed boxes "Support for USB CD ROM" and "Installation from USB CD ROM"
once you install using an external CD/DVD drive
|
|
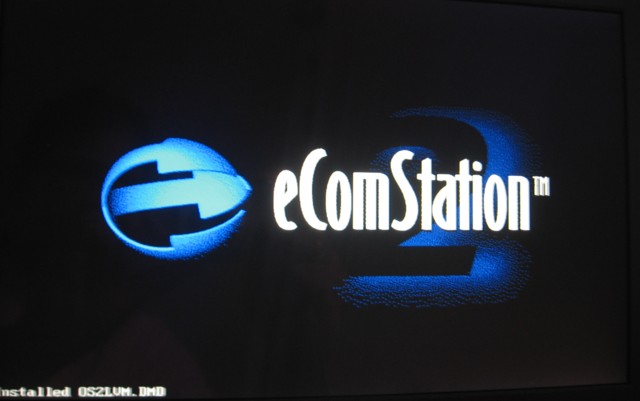
Drücken Sie zum Abschluss ALT+F2 um die Treiber beim Booten zu
beobachten und evtl. "Hänger" zu erkennen
|
To start the Installation Finally Press ALT+F2 to watch the drivers while being loaded in case of errors
|
|
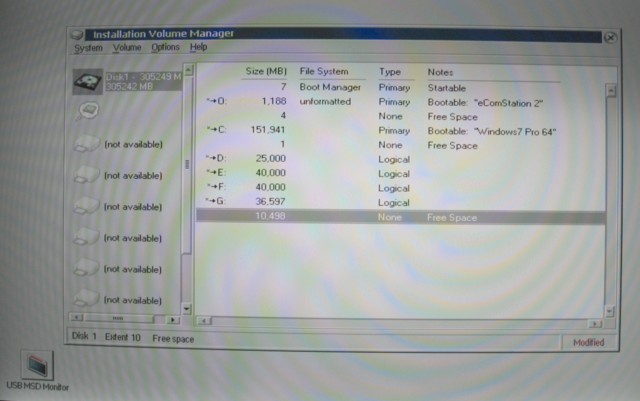
Im Auswahlmenü zur Installation wählen sie die "Management Console"
und starten dort die grafische Festplattenverwaltung um den Bootmanager zu
installieren und die Laufwerke anzulegen, danach starten Sie erneut den PC
und installieren nun eComStation in Ihr "neues Laufwerk"
|
Choose the "Management console" and install the Bootmanager and the Partitions now, reboot and restart the installation again, you can install eCS 2.0 now
|
|
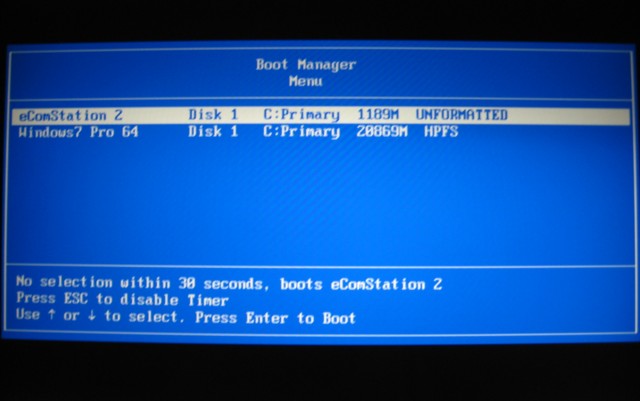
Wenn die Installation abgeschlossen ist, starten Sie neu und Sie können
nun zwischen eComStation 2.0 und Windows 7 per Bootmanager wechseln!
|
Once the Installation finished restart, and you can use the Bootmanager to select the operationg system you like or need
|
|
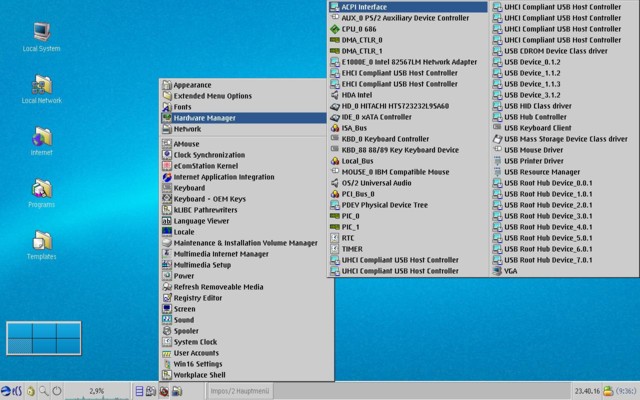
Hier ein Blick in den Hardwaremanager nach der Installation - mit aus der Betazone installiertem neuen Intel LAN Treiber (experminetell)
|
A view of the Hardwaremanager direct after Installation - including the new Intel LAN Driver from the eComStation beta Zone.
|
|
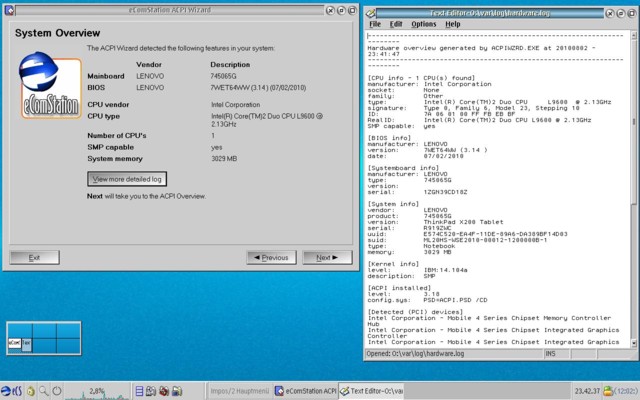
Noch ein Blick auf ACPI
|
This is what ACPI support looks like
|
Dockingstation
|
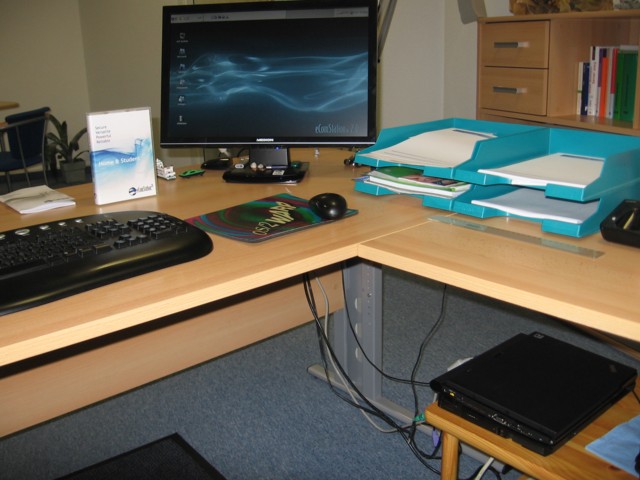
Für das Lenovo X200T gibt es eine Dockingstation ("Ultrabase")
mit weiterten USB Anschlüssen etc. Diese wird ganz hervorragend
von eComStation unterstützt, z.B. auch der externe Monitor.
|
There is a Dockingstation ("Ultrabase") availiable for the Lenovo X200T that
is really well supported by eCS 2.0. i.e.. the external Monitor.
|
|
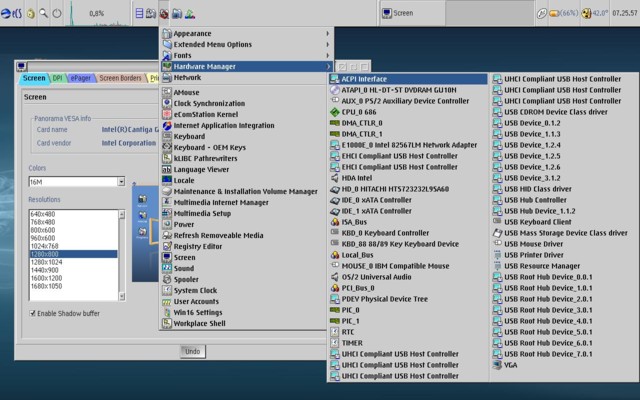
Der Hardwaremanager wird auch automatisch um das eingebaute DVD Laufwerk etc. erweitert
|
The additional devices (i.e.: internal DVD Burner) are automatically added to the Hardwaremanager
|
Weitere Hinweise / Additional Information
- Achtung: die Nutzung von eComStation kann das Notebook stark erhitzen, insbesondere bei Netzsteckeranschluss
- WLAN, Bluetooth und einige andere Treiber sind nicht vorhanden
- Sollte Ihnen diese Anleitung gefallen haben und Sie meinen etwas dafür spenden zu wollen, so unterstützen Sie doch bitte OS/2 - eCS Projekte von Silvan Scherrer (Virtualbox, JAVA usw.) via www.mensys.nl
- Ja - es gibt vermutlich und selbstverständlich andere und bessere Wege für dieses Vorgehen - dies ist die Weise wie es bei mir funktioniert hat.
|
- Warning: the use of eComStation will probably cause a lot of heat with your notebook, so please take care, especially when connected to AC Power
- WLAN, Bluetooth and some more drivers are not availiable
- If you feel you would like to donate something, please feel free to support one of the OS/2 - eCS projects of Silvan Scherrer (i.e.: Virtualbox, JAVA ..) via www.mensys.nl
- Yes, there are other ways to reach the goal, this is just the way that worked for me.
|
| |
Marken / Acknowledgements
Folgende Produkte sind Marken der folgenden Eigentümer/ Registered Trademarks are:
- Windows 7 - Microsoft
- eComStation - IBM, Serentiy Systems, Mensys
- OS/2 - IBM
- DFSEE - FSysSoftware
Kommentare: Eugene Gorbunoff 
2010-08-17 13:56:20 | Add-ons:
1) /CD switch for ACPI - usually you need it for motherboards with Intel chipset + if you run SMP APIC mode. No need to use it in other cases.
1b) ACPI.PSD version?
2) It is recommended use AirBoot Boot Manager, IBM BootManager is not recommended if using Windows 7.
3) There is no need to use DFSee, eComStation 2.0 is equipped with disk tools.
| Sigurd Fastenrath 
2010-08-21 04:28:40 | Yeah, that's what it makes painfull to write something about eCS: you should have read the last passage: "Yes, there are other ways to reach the goal, this is just the way that worked for me."
Regarding your addons:
1. /CD - hm - the Lenovo Laptops I use(d) do allways had (have) Intel chipsets
1 b. - 3.18 (with earlier versions the crashes came earlier :-) ) - this is the one shipped with eCS 2.0 GA - the software that is mentioned as "required"
2. I know that Mensys plans to include AirBootManager in eCS - but eCS 2.0 GA dos NOT include it - the IBM Bootmanager does work perfect for me - as described above. So where is the need for something else??
3. If YOU did get it to run with the eCS Tools - that's fine - for ME they did not - it was allways the best way to use the bootable DFSEE CD - that is by the way free of charge for a limited time. But I recommend to support DFSEE itself - it is really helpfull. And by the way - the eCS Tools are in fact parts of DFSEE. | Ivan Demishkevich 
2014-06-30 09:10:13 | I use symon R3 (system boot manager) Ease. [url]
Install eCS 2.2b to HP Pavilion dv6 with Win7 preinstalled without any complication. All works well (LAN, Audio etc. xWlan not tested yet) |
Kommentiere diesen Artikel.

|
eComStation it's a reactive system, comfortable to use. 'Pre-emptive' multitasking + support of multi-processor/multi-core computers since 1994 + major part of programs are using Multi-threading. |
|
|
 |

IBM OS/2 Warp
|


